Friday, December 23, 2005

[NEWS]本田 ASIMO 智慧型機器人升級


ASIMO是 Honda 投入無數科技研究心血的結晶,更是目前全球少數具備人類雙足行走能力的類人型機器人,它憨厚可愛的型式博得許多人的喜歡;近日更是實現了新升級,落實了對控制組件的改進,運動起來比以前更為靈活(奔跑速度可達 6km/h,為先前 2 倍)。特別是在手腕中內置了6軸力量傳感器,在感知手持物品重量的同時,透過降低致動器的齒輪比和提升控制的柔性等,呈現出承接物體等需要精細控制的動作。目前,新的 ASIMO 機器人利用其身上安裝的可以閱讀身分識別卡片上的微晶片的傳感器,認出從背後走過來的一位女生;也可以作出端盤子,送咖啡等較為複雜的動作,或許不久的將來,公司中的接待都可以由他勝任了,我們的家務活什麼時候也讓ASIMO來給我們承擔,應該不會等太久吧。

Monday, December 19, 2005

[NEWS]Sony robot keeps a third eye on things


TOKYO, Japan (Reuters) -- Robots may not be able to do everything humans can, but the latest version of Sony humanoid robot has something many people might find useful: a third eye.

The QRIO has a camera eye on its forehead that allows it to see several people at once and focus on one person.

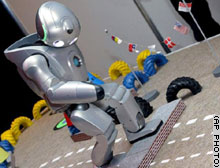
The Japanese consumer electronics company's roller-skating robot, QRIO, has now been enlightened with an extra camera eye on its forehead that allows it to see several people at once and focus in on one of them.
At an exhibit on intelligent machines in the glitzy shopping district of Ginza on Friday, Sony unveiled the new and improved QRIO, which walked jauntily toward the audience, swinging its hips to music.
"Hello everyone," it said in Japanese. "I am Sony's QRIO. Let me introduce you to my new camera and improved arms."
It demonstrated its newfound flexibility by wiggling its fingers and waving its arms in a breakdance move.
The toddler-sized QRIO, which stands 58.5 centimeters (23 inches) tall and weighs 7.5 kilograms (16.5 pounds), then turned towards a group of women, responding to one who was waving to it.
"These new capabilities bring humans and machines closer together," said Katsumi Muto, general manager of Sony's Entertainment Robot unit.
"We're aiming for a machine that doesn't just respond to commands but also reaches out to humans."
The new QRIO also showed off its ability to identify blocks by size and color, lift them using its lower body and stack one on top of the other with its dextrous fingers.
"I wonder if I can handle this," QRIO muttered to itself as it carried out the task.
Standing in front of the successfully stacked boxes, QRIO ended the demo with a little victory dance.
Sony plans to start shipping samples next March of a camera module version of QRIO's third eye, which it calls a "chameleon eye."
Muto said Sony had no plans to market QRIO itself but would apply new developments into other products.

[OpenCV] Some Janpanse Turtorial

http://ace.seman.cs.uec.ac.jp/~takahashi/OpenCV/src/camshift.cpp

/**********************************************************************/
/* ● CamShift ( 連続順応手段変換 ) アルゴリズムの実装 ● */
/* */
/* 参照元:OpenCV ML でのメッセージ */
/* http://groups.yahoo.com/group/OpenCV/message/9679 */
/* */
/* リンク */
/* DirectShow : quartz.lib strmiids.lib strmbase.lib strmbasd.lib */
/* IPL&OpenCV : ipl.lib highgui.lib cv.lib */
/* */
/* 注意 */
/* iCamShift.h をコピーして持ってくる */
/* */
/* 2003.01.30. 高橋 */
/**********************************************************************/
/****************************************************/
/* メイン部分 */
/****************************************************/
// CamShift 実行
mycamshift.callback(image);
// ウィンドウを表示
cvShowImage( wndname, image );


/****************************************************/
/* グローバル宣言 */
/****************************************************/
#include "cv.h"
#include "streams.h"
#include "CV.hpp"
#include "iCamShift.h"
#include "highgui.h"
#include
static bool IsInit = false;
static bool IsTracking = false;
CvCamShiftTracker m_cCamShift;
CvCamShiftParams m_params;
CvRect m_object;
/***************************************************************/
/* コールバック (フレーム取得毎に呼ばれる) */
/***************************************************************/
void CMyCamShift::callback(IplImage *image)
{
if (IsTracking) // ● [分岐1] トラッキング状態なら
{
// CamShift を適用 (ヒストグラムを初期化しない)
ApplyCamShift(image, false);
// ヒストグラムモデルに一致する色分布に十字を描画
DrawCross(image);
}
else // ● [分岐1] トラッキング状態でなければ
{
// 解像度を取得
CvSize size = cvGetSize( image );
if (IsInit) // ● [分岐2] トラッキングボタンを押したら
{
// 確率分布の計算領域(始めの赤い四角) の計算
m_object.x = cvRound( size.width * m_params.x );
m_object.y = cvRound( size.height * m_params.y );
m_object.width = cvRound( size.width * m_params.width );
m_object.height = cvRound( size.height * m_params.height );
// CamShift を初めて適用 (ヒストグラムを初期化)
ApplyCamShift( image, true );
// トラッキングOK
IsTracking = true;
}
else // ● [分岐2] 初期状態ではここにくる
{
CvPoint p1, p2;
// 確率分布の計算領域(始めの赤い四角) の計算
p1.x = cvRound( size.width * 0.4f );
p1.y = cvRound( size.height * 0.3f );
p2.x = cvRound( size.width * (0.4f + 0.2f));
p2.y = cvRound( size.height * (0.3f + 0.3f));
// 計算領域を表示
cvRectangle( image, p1, p2, CV_RGB(255,0,0), 1);
}
}
}
/***************************************************************/
/* トラッキング開始 */
/***************************************************************/
void CMyCamShift::Start_Tracking()
{
m_params.x = 0.4f; // 確率分布の計算領域(始めの赤い四角) の初期倍率
m_params.y = 0.3f;
m_params.width = 0.2f;
m_params.height = 0.3f;
m_params.Smin = 20; // channel-1 の最小値
m_params.Vmin = 40; // channel-2 の最小値
m_params.Vmax = 255; // channel-2 の最大値
m_params.bins = 20; // ヒストグラムの数値
m_params.view = 0;
m_params.threshold = 0; // 閾値
IsInit = true; // 初期化OK
IsTracking = false; // トラッキングはまだ
}
/***************************************************************/
/* CamShift を適用 */
/***************************************************************/
void CMyCamShift::ApplyCamShift(IplImage *image, bool initialize)
{
CvSize size;
int bins = m_params.bins;
// 色ヒストグラムの設定
m_cCamShift.set_hist_dims( 1, &bins ); // ヒストグラム値
// m_cCamShift.set_thresh( 0, 1, 180 ); // (注)Beta_3 では除外
m_cCamShift.set_threshold( 0 ); // ヒストグラム閾値
m_cCamShift.set_min_ch_val( 1, m_params.Smin ); // channel-1 の最小値
m_cCamShift.set_max_ch_val( 1, 255 ); //      の最大値
m_cCamShift.set_min_ch_val( 2, m_params.Vmin ); // channel-2 の最小値
m_cCamShift.set_max_ch_val( 2, m_params.Vmax ); //      の最大値
// 画像データ取得
cvGetImageRawData( image, 0, 0, &size );
// 探索ウィンドウがアプリのウィンドウを超えた場合の処理
if( m_object.x < 0 ) m_object.x = 0;
if( m_object.x > size.width - m_object.width - 1 )
m_object.x = MAX(0, size.width - m_object.width - 1);
if( m_object.y < 0 ) m_object.y = 0;
if( m_object.y > size.height - m_object.height - 1 )
m_object.y = MAX(0, size.height - m_object.height - 1);
if( m_object.width > size.width - m_object.x )
m_object.width = MIN(size.width, size.width - m_object.x);
if( m_object.height > size.height - m_object.y )
m_object.height = MIN(size.height, size.height - m_object.y);
// 探索ウィンドウの位置をセット
m_cCamShift.set_window(m_object);
// 色ヒストグラムを初期化するならば
if( initialize )
{
// ヒストグラムをリセット
m_cCamShift.reset_histogram();
// 探索ウィンドウ内の色ヒストグラムを更新
m_cCamShift.update_histogram( (CvImage*)image );
}
// 探索ウィンドウ内の物体の位置を更新
m_cCamShift.track_object( (CvImage*)image );
// オブジェクトにフィットした探索ウィンドウに再設定
m_object = m_cCamShift.get_window();
}
/***************************************************************/
/* 十字を描画 */
/***************************************************************/
void CMyCamShift::DrawCross(IplImage *image)
{
float cs = (float)cos( m_cCamShift.get_orientation() );
float sn = (float)sin( m_cCamShift.get_orientation() );
int x = m_object.x + m_object.width / 2;
int y = m_object.y + m_object.height / 2;
CvPoint p1 = {(int)(x + m_cCamShift.get_length() * cs / 2),
(int)(y + m_cCamShift.get_length() * sn / 2)};
CvPoint p2 = {(int)(x - m_cCamShift.get_length() * cs / 2),
(int)(y - m_cCamShift.get_length() * sn / 2)};
CvPoint p3 = {(int)(x + m_cCamShift.get_width() * sn / 2),
(int)(y - m_cCamShift.get_width() * cs / 2)};
CvPoint p4 = {(int)(x - m_cCamShift.get_width() * sn / 2),
(int)(y + m_cCamShift.get_width() * cs / 2)};
cvLine( image, p1, p2, CV_RGB(255,0,0), 1, 8 ); // 長径
cvLine( image, p4, p3, CV_RGB(0,0,255), 1, 8 ); // 短径
// 以下はデバッグ用
if((p1.x != p2.x) && (p3.x != p4.x))
{
// 動的に変化する探索ウィンドウを表示
cvRectangle( image,
cvPoint(m_object.x, m_object.y),
cvPoint(m_object.x + m_object.width,
m_object.y + m_object.height),
CV_RGB(255,0,0), 1);
CvFont font;
cvInitFont( &font, CV_FONT_VECTOR0, 0.5, 0.5, 0.0, 2 );
cvPutText( image, "p1", p1, &font, CV_RGB(255,0,0));
cvPutText( image, "p2", p2, &font, CV_RGB(255,0,0));
cvPutText( image, "p3", p3, &font, CV_RGB(0,0,255));
cvPutText( image, "p4", p4, &font, CV_RGB(0,0,255));
}
// 十字が描けなくなったら設定をリセット
else
{
IsInit = false;
IsTracking = false;
}
}

Friday, December 16, 2005

[LINK]機器蟲結構diy參考-


#1 機器蟲結構diy參考-連結
各位大大好!!!http://www.lynxmotion.com/ViewPa ... y&CategoryID=19這個網站出了相當多的套件,也有詳細的組裝說明,可以參考其Assembly Guides的結構設計,自己找材料來diy看看!!開始可以用薄木板可以的話可以找abs或pvc板材以上用線鋸機加工較容易要是用金屬板材則須冷作工法,這個可能要問

[LINK]五足機器人


#1 五足機器人-連結各位好!!http://www.seattlerobotics.org/encoder/200304/RyanW/ryan_robots.html這個網站收集許多機器人,其中CHARLOTTE有製作日誌PDF檔,當初就是看了這個才開始收集資料做機器蟲,大家不妨試試看!!

Tuesday, December 13, 2005

[OpenCV] Tracking LED's with OpenCV and CAMSHIFT

Hi Mike,
I must say you are going to do a really nice project.
Well, according to best of my knowledge CAMSHIFT is not heavilydependent on the colour. If you somehow create the blob, usingthresholding or what ever the method CAMSHIFT will help you to track it.But as u said you must give the first position.
Initially, you can have a better algorithm to detect exactly thelocation of LEDs. As soon as you detect the LEDs you can switch to thenormal algorithm where you just track what you have acquired initially.
You have to do is segment the LED section properly and find the contour.After getting the contour of the blob give that to the CAMSHIFTfunction.
int cvCamShift(const CvArr* prob_image, CvRect window, CvTermCriteriacriteria, CvConnectedComp* comp, CvBox2D* box=NULL);
As I remember (used this function in 2002 ;-)), you should give theinitial window through "window" and get the next window to be considered through "comp->rect". Then apply that new window as the initial windowwhen it is called next time.
Hope this will help you. Good Luck![I have used camshift to track a person inside a room. CAMSHIFT workedperfectly. I just found the blob using a normal skin color detectionmethod. And just gave the blob contour bounding box to the CamShift.]
Regards,
Ruwan Janapriya
-----Original Message-----From: OpenCV@yahoogroups.com [mailto:OpenCV@yahoogroups.com] On BehalfOf MikaelSent: Tuesday, September 20, 2005 12:39 PMTo: OpenCV@yahoogroups.comSubject: [OpenCV] Tracking LED's with OpenCV and CAMSHIFT
Hi,I'm currently working on a project to build a helicopter which I thenhave to track (and control) using a camera + opencv.
I'm going to mount 4 LED's beneath the helicopter (in a form of across), and then track them from ground using a webcam to figure out itsorientation.I have had thoughts using CAMSHIFT, but after some research I'vediscovered that it relies heavily on colors. Colors could be a problemsince the main plan was to use IR LED's, and that would make most of theimage BW.The other problem is that I have to manually tell CAMSHIFT what itshould track (by putting a small box around one of the LED's), and Iwould rather have a system running that auto discovers the LED points.
Anyone got a suggestion for another tracking method approach maybe?Any help would be greatly appreciated!
Mike

Friday, December 02, 2005

[Surface]Accurate and Scalable Surface Representation and Reconstruction from Images


MIT-LCS-TR-1011

Abstract:
We introduce a new surface representation, the patchwork, to extend the problem of surface reconstruction from multiple images. A patchwork is the combination of several patches that are built one by one. This design potentially allows the reconstruction of an object of arbitrarily large dimensions while preserving a fine level of detail. We formally demonstrate that this strategy leads to a spatial complexity independent of the dimensions of the reconstructed object, and to a time complexity linear with respect to the object area. The former property ensures that we never run out of storage (memory) and the latter means that reconstructing an object can be done in a reasonable amount of time. In addition, we show that the patchwork representation handles equivalently open and closed surfaces whereas most of the existing approaches are limited to a specific scenario (open or closed surface but not both). Most of the existing optimization techniques can be cast into this framework. To illustrate the possibilities offered by this approach, we propose two applications that expose how it dramatically extends a recent accurate graph-cut technique. We first revisit the popular carving techniques. This results in a well-posed reconstruction problem that still enjoys the tractability of voxel space. We also show how we can advantageously combine several image-driven criteria to achieve a finely detailed geometry by surface propagation. The above properties of the patchwork representation and reconstruction are extensively demonstrated on real image sequences.
MIT-LCS-TR-1011.pdf - pdf format, 35 pages long